The Importance of Research / What Type of Modeler are You?
In my ĹResearcher / Modelerĺ profile I noted that, based on present activity alone, I have become more-or-less primarily a 'researcher.' I am finding this can be a double-edged sword. As important as research can be to the success of a render there is always the inhibitor that much more can be discovered. This can result in a modeling stall. Knowing when one has Ĺjust enoughĺ to commence a project is a delicate, and sometimes difficult, balance to strike. As is often the case, the joy of a new discovery is coupled with the frustration of requiring still more information. This can be quite the ĹCatch 22ĺ.
Whether you embark on a period of dedicated research prior to building depends on the type of modeler you are. Many modelers are quite happy to build Ĺstraight out of the boxĺ; others strive for a higher level of detail and accuracy in their presentation. It should be noted that both approaches are equally valid, as the resulting enjoyment and satisfaction to the modeler can be the same. All in all, modeling should be fun, relaxing and satisfy oneĺs creative drive. However, I can not help but believe that the Ĺout-of-boxersĺ are the ones who actually whistle at their workbenches, unencumbered by the need to correct all the minor nuisances (as Shakespeare once quipped: the mote of dust that scratches the mindĺs eye). Most fixes, once corrected, probably will not be noticed (or appreciated) in any event. Yet, many modelers are so intimidated by the prospect of producing a less than 100% accurate render, as per the standards of others (Gawd! Your vent is backward!), the self-imposed need and expectation to build correctly can overshadow the actual joy of building. I suspect this is one reason why many modelers, by default, become collectors ~ kits keep being added to the pile. Not enough time, dare begin for fear of making a mistake. Fellow DF member, Don Stoltenberg, recently shared his thoughts on this subject. I believe his sentiments are worth sharing:
For simplification, I am making the case for two basic approaches to ship modeling. Call them Accuracy and Character, comparable perhaps to Classical and Romantic.
The classic modeler is concerned with realism, making the model as close to a perfect miniature of the original as possible. Thus when faced with a model kit, he usually feels the frustration of discovering simplifications, inaccuracies of scale and detail. What must be done? Remove the offending parts to be replaced with his own constructions, or follow the kit instructions and make the best of a bad job? Compromise is not acceptable to purists. One alternative is to eliminate anything that is inaccurate, preferring nothing to a mistake. A decision has to be made. If the errors in the kit parts are numerous, better to avoid it altogether? How many times have we gone ahead because there simply was no alternative except scratch building, which though admirable is a major undertaking? In the end is it not better to spend the effort and time to build one supremely correct representation of an admired ship then to construct five inferior ones? Similarly the marine artist, bent upon accuracy will research the construction of a ship, its proportions, its rigging, its paintwork, the sea it sails upon, the wind and its effects, the weather conditions, the lighting to produce a faithful representation. Mind you, all this care may produce a near perfect result, a classic, but it will not guarantee a work of art.
To explore the other direction, some of the most satisfying models I have seen have not been the most accurate. Primitive models, sometimes done by sailors, can be alive with feeling. I have seen model liners done by some who has only seen the original in a bow-on photograph and thereby missed the proper proportions, making the foredeck long and the rest of the ship compressed towards the stern, that have been completely winning. Mainly, I suppose, because of the feeling incorporated into the work. Toy boats made of painted tin or wood have achieved an amazing following because of their character and age. Likewise in marine painting, primitive or distorted images can express a quality and feeling quite different. The great 19th century British landscape and seascape painter JMW Turner took great liberties with the ships he painted but few would deny their power and romantic feeling.
I have chosen two extremes and most work may lie somewhere in between, but I wanted to make the point that there are many legitimate approaches and each model (or painting) should be judged with an open mind.
Don raises several interesting points, one being the striving for a near perfect miniature of the original. I refer this as being the Ĺshrink gunĺ mentality, a popular sci-fi concept (2nd perhaps to the time machine), the ability to shrink an object to a fraction of its original size where every detail of the 1:1 scale is faithfully reproduced. This Ĺshrink gunĺ mentality has even permeated the R/D studios of major model companies. The result ~ over scaled hull strakes and rivets which, for the most part, should rightfully be ignored on scales less than 1:350, and even at 1:350 such details are often exaggerated to the point of being comic. I have often come across the phrase Ĺmuseum qualityĺ mentioned in reference to assembly kit models. I have visited several maritime museums in my travels and have yet to come across a model, whether 2ĺ or 20ĺ long, of a liner featuring hull strakes and rivets. I consider a Ĺstatic displayĺ as being akin to Ĺpresentation modelsĺ, a representation of a particular vessel, not necessarily a Ĺray gun shrinkdownĺ. In my view, presentation models, mounted on spun brass pedestals, are meant to be pristine ~ no weathering, rust, or God forbid, tiny scale people! They are built to convey the overall Ĺessenceĺ of a particular ship, not necessarily the finite detail, although such detail, while not absolutely necessary, can be remarkable.
In support of the Ĺless intimidatedĺ approach, although I have authored, and co-authored several kit reviews highlighting the Ĺoptional correctiveĺ measures one could consider to improve the Ĺout-of-boxĺ offering I believe in the concept of the Ĺnautical scale mileĺ. Consider for a moment the ss France, the longest liner ever produced as a plastic assembly kit. At 1035ĺ overall, her nautical scale mile would be approximately 5 model ship-lengths (8.75 feet). If your model, at that viewing distance, reads ĹFranceĺ then you have no cause for concern regardless if you mistakenly missed a strand of rigging. If you chose to Ĺanal-yzeĺ your project, do so because you enjoy doing so, not because you feel you must in order to be accepted as a member of the Ĺclubĺ, so to speak. Be your own judge.
For the purpose of this discussion, I assume you, the reader, is the Ĺdetailed / letĺs fixĺ modeler, as most of us have become (the ĹForumĺ would be a very dull place if we were not!). With kit in hand, you are faced with two major decisions: full-hulled vs. waterline diorama, and the era you wish to represent. Although the pros / cons of a diorama is beyond the scope of this article (perhaps a future one), the selection of ĹĹeraĺ is one which will require dedicated research as most liners have undergone numerous alterations (save for Titanic) and rebuilds during their service years. The QE2 immediately comes to mind. Before getting out the files, paints and brushes it is important to take the time to get to know your ship. Dedicated research is the key to any correct render, although an incorrect render can be equally satisfying, and quicker if time is of essence, to produce.
One of the 1st things to determine is whether the model accurately represents the shipĺs introduction into service. Most do (or strive to), however, there are kits available that do not. Two examples: the Revell Queen Mary and the Airfix Queen Elizabeth. Both represent the ship more-or-less as they were during the mid to late 50ĺs. The clue? Stabilizers. Both liners were only fitted with stabilizers post-1955, thus if you desire to render either model as it was on its maiden (commercial) voyage, the stabilizers must go. The same can be said for the configuration of each linerĺs Veranda Grill, aft. During her 1st year of service the QM did not sport the extra bulk above the grill (added in 1937) and the QE featured, during her early commercial years, a recessed terrace aft of the grillroom proper. The model features this open terrace Ĺbuilt-overĺ. The excellently rendered QE wartime diorama, by Ken Hoolihan, in the Modelwarshipĺs Gallery, depicts the Veranda Grill, pre-1950ĺs, accurately. The 2nd thing to determine is whether the kitĺs assembly instructions are correct with respect to paint references. Most attempt to be, offering a Ĺsnapshotĺ of the shipĺs livery at a given time. However, mistakes are bound to appear, unchecked, and many instructions do not list all the required paint colors. A good portion of your research effort will be spent determining the correct color scheme of your selected Ĺtime periodĺ. Depending on your selected Ĺyear of serviceĺ the assemblyĺs paint references may be of limited use to you, or as is the case of the Revell 1:1200 QE2, completely inaccurate and for the most part should be ignored.
By the above examples I attempt to point out the inherent ambition many of us suffer, that is to show as much as we can about the ship without due consideration for Ĺtime periodĺ accuracy. A wartime full-body render of the QM / QE should not have stabilizers. Likewise, a maiden voyage Canberra should not feature the P&O logo on the superstructure, aft of the lookout bar (the P&O logo came after the roofing over of the open ĹStadiumĺ forward ~ it is either open Stadium without logo, or roofed-over Stadium with logo, but not both). Once you select the period of service you wish to capture you can begin to concentrate on obtaining all the information you possibly can, and to document the required fixes so that your render will be Ĺtrue to timeĺ, whether it be a structural addition / subtraction, or simply a paint scheme change. Consider, again, the QE2. There are several key periods that can rendered: pre-1972 (as she entered service); 1972 ľ 77 (the 1st penthouse addition); 1977 ľ 1982 (following the addition of the QM / QE deluxe suites); 1982 (Falklands / post-Falklands), etc. Each period represents a uniquely different QE2. Research will go a long way in determining what belongs and what does not.
So, where to begin? Actually, researching your subject ship is not as difficult as it may first appear to be. This is especially true since the advent of the Ĺwwwĺ, as even information on the most obscure vessel can probably be found, provided you exercise patience and not become too discouraged if your first attempt is not too successful. Other considerations:
Shipping / Cruise Lines: Perhaps, strangely enough, not the best (or 1st) source of information. Many of the major Atlantic / Pacific shipping lines either no longer operate, or if they do in a transformed mode, most of the information they once had, with respect to the ships they operated, have been archived. As been my experience most shipping / cruise lines do not acknowledge Ĺmodeler requestsĺ for information.
National Museums / Maritime Museums and Archives: These organizations can be a wealth of information, provided you know exactly what you are looking for. However, keep in mind that their services (search / reproduction), for the most part are not without cost. Thus, it may be more economical to focus your research efforts on sources of information provided free of charge.
Your Local Library: The obvious starting point as most libraries feature a Ĺtransportation sectionĺ (do not dismiss the Ĺhistory sectionĺ, as well). Although the Ĺwwwĺ has become todayĺs virtual library, existing publications, especially those published around the time of your subjectĺs introduction into service, are valuable aids in determining the original design intent and construction, if this is the era you are attempting to capture. Although publications devoted to a single subject promise to offer more information, do not dismiss the numerous Ĺpictorial historiesĺ. These, being retrospects, do tend to offer many Ĺas builtĺ difficult to find photographs.
Company Cruise / Shipping Line Brochures: Rare collectibles indeed, these can provide a wealth of information as early brochures, unlike todayĺs ĹCruise Atlasesĺ, tended to focus more on the shipboard experience, not the destination. Much can be gleamed about ship, and decks, from these offerings. And do not dismiss contemporary magazine advertisements, such as those that can be found in back issues of National Geographic. Again, an afternoon at your local library may be time well spent.
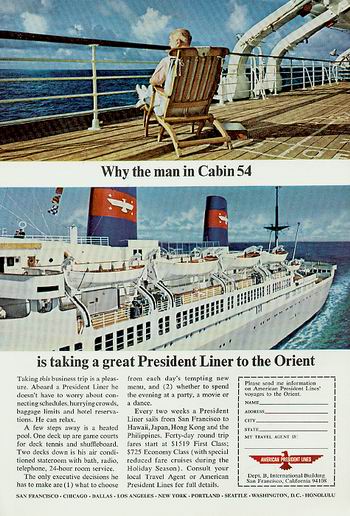
A typical 1950ĺs National Geographic advertisement, pitching the advantages of a 20 day round-trip voyage aboard the President Cleveland to prospective business travelers, something that today would not even be considered! Such can reveal much about the ship, decks, equipment and overall livery during a particular service era not represented by deck plans alone. Ad courtesy of Don Stoltenberg.
Builderĺs Plans: Somewhat difficult (and expensive) to acquire, these are mostly sought by the more serious (and experienced) scratch-builders. It doesnĺt make much sense to fork over hundreds of dollars for a set of plans, if they exist, as a reference to correct a 1:600 ~ $29.00 plastic kit. However, deck (or GA ~ general arrangement) plans of your subject ship are a great researching starting point, especially those beautifully executed (and today rare) plans of yesterdayĺs liners that indicate portholes, window and door groupings / locations. For a modest cost, plans can be photo-reduced / enlarged to equal the scale of your model, providing excellent templates for confirming the shape of deckhouses, location of equipment, access doors and the like. It is somewhat ironic that, in spite of advances in computerized drawing over what was capable during the 50ĺs and 60ĺs, todayĺs Ĺbrochure plansĺ pale by comparison. A note of caution ~ many deck plans use Ĺparallel linesĺ as a symbol to represent Ĺpassenger accessibleĺ decks. Assumed to be planking, the actual deck material may not be. Always crosscheck your references.
The knowledge and efforts of other ĹDF Researchers and Modelersĺ: Last, but not least, the wealth of information collectively amassed by DF Members should not be overlooked. Living in the age of scanners / emails, most that is within our respective libraries can be easily shared / distributed to others, either one-on-one, or publicly posted on the Forum if the subject is of interest to many. As noted in the ĹAbout Usĺ page, a focused question (Was the aft deck planked?) is bound to result in more specific Ĺmodeler usableĺ information than general queries (I need to know everything about Lusitania ~ Please help!). I have yet to meet a DF Member who was not willing to share (within reason, obviously ~ do not expect one to photocopy a 300 page book!), either without cost or subject to a minor reimbursement to cover the reproduction / shipping. A posting on the ĹMessage Forumĺ can perhaps eliminate hours of research elsewhere.
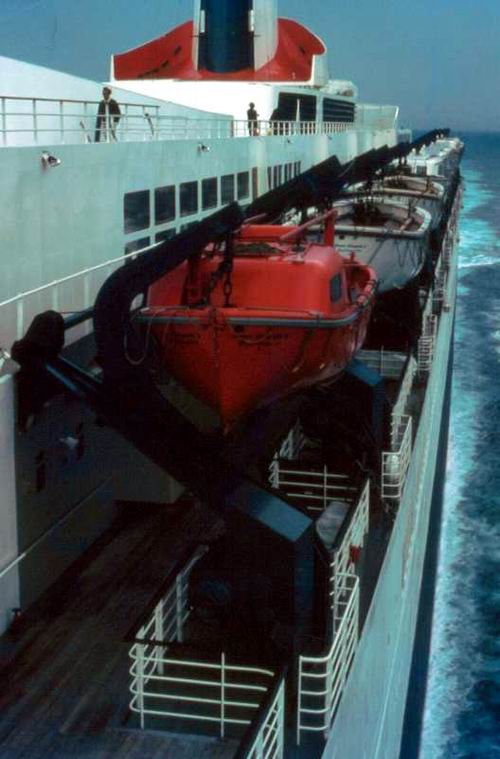
What ship? Photographs from the private collections of DF Members can be a wealth of modeling information. This QE2 photo during a 1969 voyage reveals many important features of the liner during this era: the color of the wind scoop, the design / configuration of railings, glazing and even waterline turbulence. Note the Ĺpaintĺ transition from white to khaki on the Boat-Deck bulkhead. Photo courtesy of Don Stoltenberg.
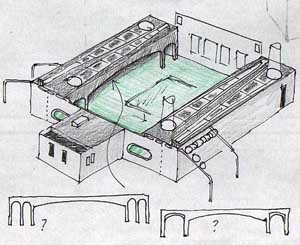
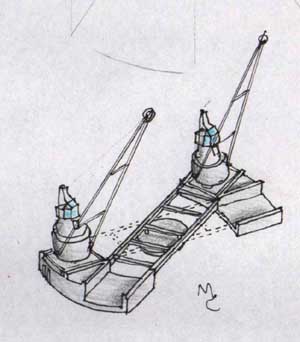
Another fine example of the research efforts of others. Based on plans and photographs, the graphic study (left) accurately conveys the configuration of Orianaĺs aft lido pool enclosure, a section of the ship roofed over in both the Modelcraft and the Lee offerings. The sketch to the right details the design of Orianaĺs two forward cranes, not featured by either kit. Sketches courtesy of Mike Cook.
One of the things you may discover is not the lack of information on your subject, but rather conflicting information that must be sorted out and cross-referenced. Thus, organizing your collected data is very important. My organizer of choice is the 3-ring binder. My original Ĺgeneral hobbyĺ binder, subdivided into different ship sections, has since evolved into individual model binders, one per ship. This allows me to photocopy / download all the neat and informative stuff, including kit reviews, recommended fixes (postings on the DF Forum) and photos of other fine modelerĺs work, to be hole punched and filed away for future reference. Even the better photographs in my personal library are either scanned / printed, or photocopied and binder bound. Being only a copy, color markers can be used to highlight key areas of study, supported by handwritten notes. I never mark an original! Making a photocopy of the kitĺs assembly instructions, to record the required fixes, is a wise move as well.
How much time should be devoted to research? This is difficult to say, as it depends on the availability of information on your subject (the more obscure the subject, the less you will uncover), the amount of time you have at your disposal and your eagerness to get started! Based on personal experience, a month or two should be sufficient to uncover most of what you will need to rectify the major fixes. If your research extends longer than six months you are heading for a modeling stall. This is particularly true if after beginning research on one, you acquire another ~ the Ĺnew additionĺ almost always takes center-stage as far as interest / priority. (This is the Ĺdouble edged swordĺ ~ five years ago I started with a single kit, today I have 35, and I keep adding to the pile!) If you are the eager type, anxious to start, there is much that can be done during your period of research: flash removal and the dry-assembly of parts to check for fit. In fact, dry-assembly can reveal much about your subject in 3-D, for ease of comparison against photographs of the actual ship.
Although research may seem to be too much like Ĺhomeworkĺ (and it is!), it is key to successful Ĺtrue to timeĺ render. Use the resources available to you ~ the Ĺwwwĺ and your local library is information Ĺfree of chargeĺ. So is the Debris Field.
Happy research and modeling!
Arjay ~ 11 / 03