Russian Atomic Icebreaker ĹArktikaĺ
Review by Mike Ristuccia
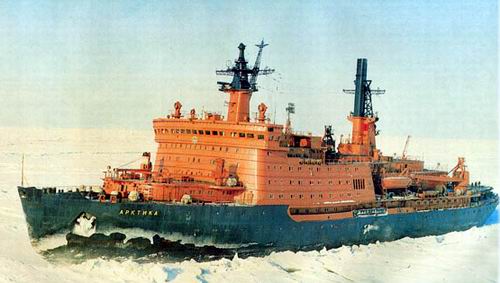
The Arktika in her element.
The Arktika (also known as the Arctic) is a ship that carries a historically important part of discovery to its name. On 22nd August 1977, she was the first vessel to have reached the North Pole, after traveling some 6200 kilometres (3876 miles) from Murmansk in Russia, with a third of that distance cutting through ice!
This is a unique model kit, mainly because it comes from a little-known Russian plastic model company called ĹOgoncjekĺ, rather than from the more common ĹAirfixĺ or ĹRevellĺ we are familiar with. There are few icebreaker kits on the market, and I purchased this one for US$9.00 (plus US$8.00 for shipping) from Rus-Sell, an Internet company that, although registered in the USA (Florida), ships all their orders directly from St. Petersburg, Russia. They also sell other Russian produced plastic model kits, along with a myriad of other goods such as porcelain, books, artwork and toys.
The kit is supplied in a somewhat flimsy cardboard box, although none of the parts were broken upon arrival. The box-top artwork depicts a hideous (and quite useless) rendering of the Arktika in its familiar ice-surrounded waters, while a polar bear looks on uninterested! Opening the box reveals the kit parts attached to their sprues on two frames in a sealed plastic bag, along with the instructions. The kit also comes with two small containers of liquid polystyrene glue. Unusually, there are no decals or flag sheet provided with this kit. I checked this with Rus-Sell and they confirmed no decals are supplied. I would assume that even if decals were supplied, they would only consist of the ship name and other minor markings. In any event, the shipĺs name, and atomic symbol, on the bow is molded Ĺraisedĺ, thus easily rendered by paint.
There are a total of 244 parts molded in gray that makes up this model of the Arktika. There was a considerable amount of flash on many of the smaller parts of my kit, along with many sink marks (on public surfaces), scratches and miss-alignments of components along the seam lines. These can all be corrected, albeit with some work, so be prepared to have a few #11 blades, filler and sandpaper handy! The hull is two pieces, and unfortunately they do not align properly, especially along the keel line. There is also a problem with the alignment of the Ĺfirst-deckĺ that sits within the hull. Dry-fitting this part revealed it rested about 1mm too high on its positioning tabs, blocking the open scuppers. Removal of all but fore and aft positioning tabs, and adding Evergreen square rod, at the proper height for deck support, corrected this problem. A further note regarding positioning tabs ~ few pieces have them. During dry-fitting, working from the top deck pieces down, you may wish to mark on the underside of the deck pieces the correct alignment, for adding positioning tabs later. Also, most deck pieces are narrower than the deckhouses to which they are attached. Thus, rather than sit on, or Ĺcapĺ the deckhouse below, they are designed (whether correctly, or not) to Ĺnestĺ in-between, somewhat lower than the height of the bulkheads. At first, this was confusing. Taking the time to undertake a through dry-fit study will eliminate most surprises during the actual construction.
Unfortunately, the kit has molded railings, and solid bulwarks, a-la Revell (Queen Mary, Brasil, United States, etc). I removed the bow and stern railings relatively easily, and replaced them with ĹTomĺs Modelworksĺ 1/400 3-rail brass photo-etch. The solid bulwarks were left Ĺas isĺ. There is also several radar, and Ĺcagedĺ masts that are also molded Ĺsolidĺ. These could also be replaced with P/E (or scratch built) if you have the money and / or inclination to do so. I left mine Ĺas isĺ, which looked reasonable, especially since they are painted ĹMatt-Blackĺ anyway.
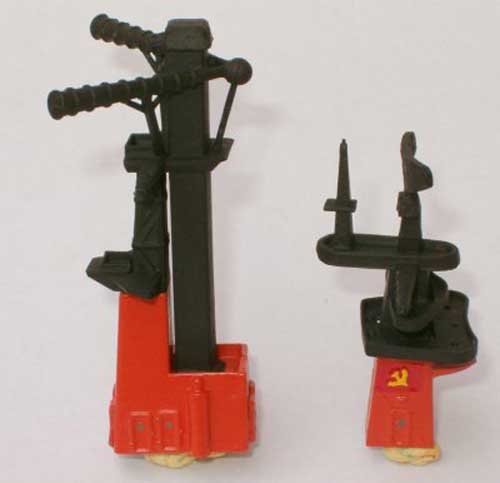
Close-up of mast / funnel components.
Although the Arktika is an interesting kit, one of the most frustrating aspects of it is the instructions. All the text of the instructions, and on the box, is Russian ~ no English translation is provided. The single-sheet instructions consist of a single, fully exploded view of most of the parts and where they go, in one step. Not all of the parts are shown on the sheet ~ an example of this is the individual bulkhead doors, of which there are 72. The positions of only a few are indicated on the instructions ľ you have to work out where all the others go. However, if you look closely at the parts you will see a series of faint Ĺpairedĺ molded lines. These indicate where a door (or other piece) is to be located. The instruction sheet, poorly drawn, is difficult to work with in determining exactly what goes where. I had to refer to photographs of the ship that I found online, which was not an easy task due to the lack of detailed information about this ship. With a bit of common sense and guesswork, the assembly stages should work out fine.
Considering the model is from an obscure manufacturer, the overall detail provided in this kit was very good. All the windows are rectangular openings in the plastic, which is more preferable to raised or sunken molded-in windows. Surprisingly, the majority of open windows are Ĺflash freeĺ. After painting each part that had windows, I simply applied ĹKrystal Klearĺ from the reverse side of the part. Alternatively, you could use clear Evergreen stock, or thin plastic film, to provide a similar effect.
Other impressive details in this kit include seven nicely formed lifeboats, including an interesting launch boat comprising of three pieces. Stairs are also supplied as separate parts (which makes replacement by P/E components all that easier), as are 18 inflatable life rafts, 72 doors (as previously mentioned), several life-rings (to be applied to the railings), 3 anchors and a helicopter. On that note, the Ĺhelicopterĺ will need a lot of modifications to actually make it look like one. Either that or you could scratch-build your own. There are 5 cranes on this ship, and each one comes with plastic Ĺriggingĺ as separate parts. They are much too thick and out-of-scale, so instead of attaching those parts I substituted black stretched sprue attached with CA glue (super-glue).
The deck beneath the bridge appeared to protrude out just a bit too far during a dry-fit of that section, so I shaved off about 2mm from the lower edge. Doing this didnĺt affect any other parts, although some filling and sanding was needed at the gap between this deck and the bridge above.
The instructions do not offer a paint scheme, unless it mentioned somewhere in the text that I was unable to read! In any case, the few reference photos I found on the web depict her with a black and red hull, and an orange-red superstructure. In most of the photos the superstructure looked more orange than red.
I am a bit of a fan of Humbrol paints, mainly for their widespread availability and low cost here in Australia, so they are the paint numbers I will refer to for my chosen paint scheme: For the hull I used ĹMatt-Black (#33) and ĹMatt-Insignia Redĺ (#153). Many of the reference photos I found do not show the actual decks, so I used the standard ĹMatt-Deck Greenĺ for this (#88). For the superstructure, I used ĹSatin Redĺ (#132), which I chose because it actually looks more orange than red in my opinion, making it what I believe is a reasonable match. A few other colors were also used such as light / dark gray, and bronze for the propellers. You will need to use your creative imagination for what you think will look best for your model. (A note about the propellers ~ they are designed to be installed Ĺflat-on-flatĺ. No positioning pin / void is provided. Thus, you may wish to drill each piece and add a suitable Ĺdiameter / lengthĺ rod, to bridge the connection. This will only work for the 2 wing propellers, as the central one, owing to the rudder, will be difficult to rework.)
The model will benefit from additional rigging around the masts and other related structures. The only rigging I did was that on the cranes mentioned earlier. I decided not to do any other rigging because I wanted to keep the patience required to do this for some of my other models! The kit comes with a somewhat chunky display stand to complete your masterpiece. There are two large holes in the keel where you insert the stand. Fee free to use your own, less invasive and obtrusive display stand methods if like!
The dimensions of the completed model (minus the display stand) are:
Length: 364mm (14 - 5/16")
Beam: 75mm (3")
Height: 147mm (5 - 13/16") - from keel to top of radar mast
Overall, I enjoyed building this model as it was challenging, and also gave me the opportunity to use a little Ĺcreative licenseĺ such as color schemes, etc. I would recommend this kit to anyone who wants a break from passenger ships, and the 1:400 scale allows you to compare with other ship models of this scale that are currently available. She is a fine addition to any Ĺmerchant / special purposeĺ ship collection. (For a waterline render of this model, please check the Ĺmodelwarshipsĺ gallery.)
What I liked:
There is a nice balance between detail and the number of parts.
The kit is relatively well priced at US $17, which includes airmail delivery from Russia.
The scale was easy to work with (although 1:600 would have been nice, for comparison to liner models liner models of this scale).
What I disliked:
The graphic instructions are of very poor quality, and all the text was in Russian, making things just that more difficult. A paint scheme would have been appreciated.
Many of the parts had excessive flash and some had poor fit, which will need trimming and sanding, etc.
The smaller the piece, the less Ĺdefinitionĺ it has. Several pieces are downright Ĺlumpyĺ.
That damned helicopter ľ itĺs terrible!!
Rating (maximum score is 10):
Quality: 5 / 10
Detail: 8 / 10
Instructions: 2 / 10
Ease of construction: 5 / 10
Value for money: 7 / 10
Overall rating: 6 / 10
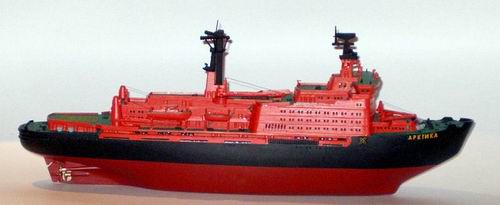
Near completed model, before the addition of P/E railings.
This kit is presently available online from: Rus-Sell at www.rus-sell.com. It should be noted that the prices quoted are at the time of writing.